Annual Condition Inspection page 3
Broken Manifold Pressure Tube
I have 1/8" copper tube running to the #3 cylinder head for the manifold
pressure sensor. When I installed this tube, I put a small single loop
in it between the engine mount and the engine to allow for engine movement.
Obviously this wasn't a sufficient way to install it as the tube broke
off near the fitting at the cylinder head. I fixed it once, but it broke
again in about 25 hours of flight time:
Before: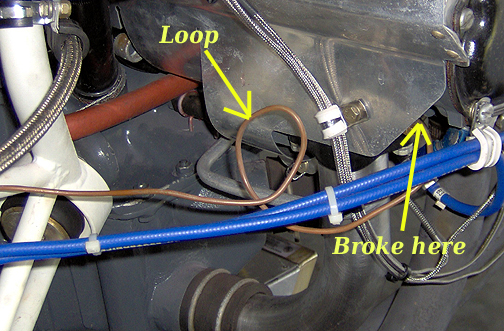
To fix it, I purchased more 1/8" copper tubing, spliced it to the existing
tube and made 3 loops. Then to support the weight of the tubing and
to stabilize it, I installed an adel clamp on the baffle between the loops
and the connector on the cylinder head.
After:
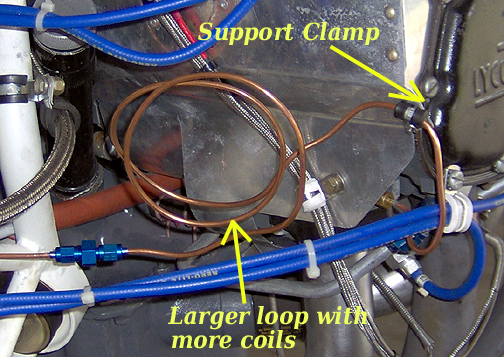
This will relieve the stress on the connector by supporting the weight
of the loops and the splice connection. Note: The tubing is not as
close to the spark plug wire as it appears in the photo.
That's about it for the Firewall Forward portion of the inspection, everything
else looked just fine. A common place for cracks to start forming is on the
baffles, but mine were just fine.
The final item before closing up the engine compartment is to replace the
air filter element with a new one. This was done and the cowling was
re-installed.
Landing Gear
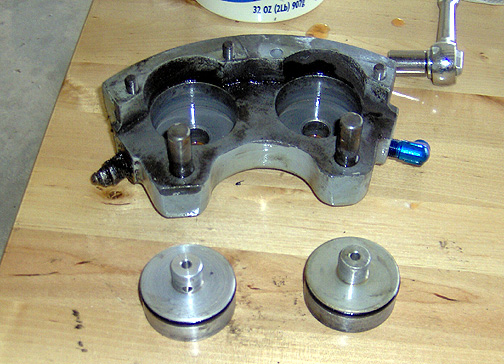
Replace Brake Pads and Fix Leaky Brake Caliper
When I built my Bearhawk, I bought some used, Cleveland double puck brake
calipers from a wrecked Cessna 180. The pads were used but still had padding
on them, so I just installed them as-is with the intent to replace them later.
They have served me well for this first year, but lately I've noticed that
there is a bit of brake fluid leaking from the left brake caliper and the
pads are now worn down to a point where they need replacement. I ordered
a new brake pad kit (complete with pads and rivets) and new piston "O" rings
for the wheel brake calipers from Aircraft Spruce.
The brake pads are held in place with special rivets. I bought the
rivet tool that allows you to remove the old rivets and brake pads and then
rivet the new pads in place. Here is the tool:
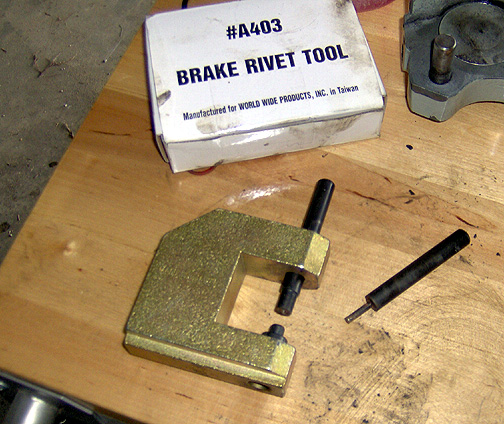
One punch has a 1/8" end to allow removal of the old rivets (the bottom
rivet set is removed for this). The other punch has a formed end to
allow the new rivets to be properly set.
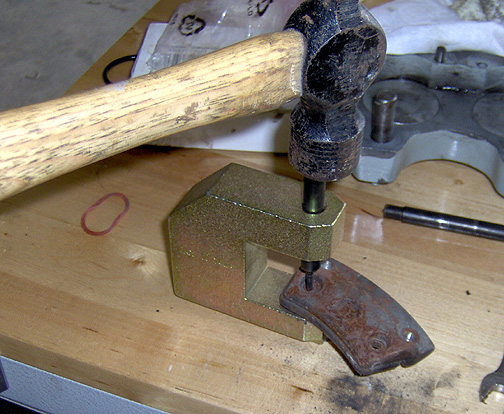
Here we are removing one of the old rivets and brake pad:
New pads were then riveted in place. Here are the new brake pads installed:

These are the Rapco brake pads. They have wear markers (see arrows) to
let you know during pre-flight inspections when you need to replace the
pads.
To fix the leaking problem, I replaced the "O" rings on the pistons. To push
the pistons out, the brake caliper was reattached to the brake line on the
airplane, and application of the brake pedal pushed out the pistons:
The pistons and brake caliper were thoroughly cleaned with kerosene and
the new "O" rings installed. The pistons and "O" rings were coated
with brake fluid before re-assembly.
Finally, before re-installing the wheels and brakes, the wheel bearings were
removed, cleaned in kerosene and re-packed with synthetic wheel bearing
grease:
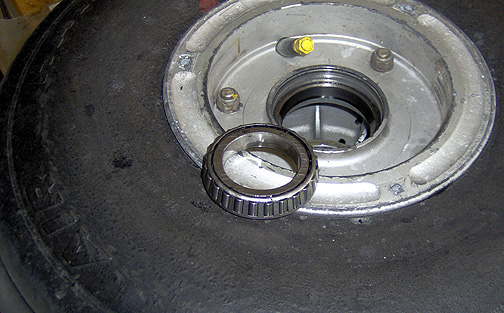
The axles were cleaned and thoroughly inspected for cracks before the
wheels/brakes were re-installed. The brakes were bled and the brake
fluid was topped off in the reservoir.
Click here to go to Annual Inspection page 4