They were identical.
June 22, 2008
Once you have completed your aircraft, the FAA will give you a restricted area to fly in during the first 25 or 40 hours. This is called "Phase One Test Flight" and must be accomplished with only one person on board and must be during daylight and under VFR conditions only. The FAA usually gives you a 25 nautical mile radius around your airport within which you must stay until completing of phase one flight testing. I asked for and got a 50 nautical mile radius around the Ocean Springs Airport.
As noted on the first flight report I had a heavy right wing. In straight and level cruise, I had to hold left stick force to keep it level. So before starting the phase one flight test regime I had planned, I needed to correct this heavy right wing condition.
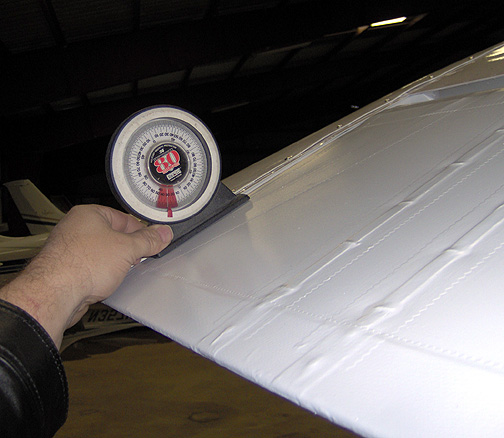
First I wanted to make sure that there wasn't some sort of rigging condition
causing the heavy wing. I started by using my angle finder to measuring the
angle of incidence on both ailerons with the stick in the neutral position.
I wanted to see if one was angled differently than the other:
They were identical.
I then measured the angle on both flaps and found that they were identical. The same thing was checked on the horizontal stabilizers (left and right) which were both at the same angle. Finally I measured the bottom of each wing along the root rib and found that both wings were at the same angle of incidence.
With all of the control surfaces checked and found to be correct, I tried a series of adjustments on the aileron pushrods trying to deflect the left aileron up more. After each adjustment I would go up and test fly the airplane to check for a heavy wing. This back and forth adjusting and flying built up a couple of hours and about 10 takeoffs and landings but I still had a heavy right wing.
I then decided to try an old trick used in the RV community. The idea is to slightly modify the trailing edge radius of the aileron on the "light" wing. So I got out my seaming pliers and very slightly squeezed the trailing edge of the left aileron full length. This almost imperceptible tightening of the radius of the trailing edge of the aileron does make a difference. I then took it up to see if it had helped any. Turns out it did help quite a bit. I would say that I cut the problem in half. That's to say, if holding the airplane level took 10 lbs of stick force before, it now only took about 5 lbs of stick force, but I still had a slightly heavy right wing.
So I came back and landed and did a little more trailing edge squeezing on the left aileron. Took off again, levelled off at 1000 feet and brought the power back to cruise power. Then with everything stabilized, I let go of the stick and v`iola, she flew hands off, straight and level. Beautiful!!!
Now I can begin the process of getting to really know the airplane and its flight characteristics. The next couple of flights were simply for pleasure and getting a good feel and comfort level with the airplane. These flights were also designed to break in the engine correctly so I kept the engine between 2400 and 2500 RPM and spent about an hour each day just flying around. I stayed between 1000 and 2000 feet doing turns at varying angles from 20 degrees to 45 degrees and generally just having a good time. This is a "rudder airplane" as they say. When you turn, you need to lead the turn with some rudder just as you start to bank into it. The same thing when rolling out of a turn, a little rudder just as you start rolling out of the turn.
When landing, I was initially coming down final at about 70 mph but have since slowed it to about 60 over the threshold and find that I get less float in ground effect. It took a while to finally nail the correct height to start the flare. The turf runway at my home airport slopes up in the middle, so the runway comes up to meet you. I find that I need to hold it off higher than I normally would to get a good landing.
With 4 hours on the airplane, I decided to go ahead change the oil, clean the oil screens and conduct a sort of mini-annual inspection on the airframe. Before draining the oil, I went up and flew around for about 15 minutes to warm it up and then came back and drained it while it was still hot. The little quick oil drain valve (Aircraft Spruce P/N P5000) that installed on the sump works great. Hook up some clear 3/8" hose to it, run the hose out the bottom cowling air exit and into a bucket. Open the valve and out comes the oil, nice and neat.
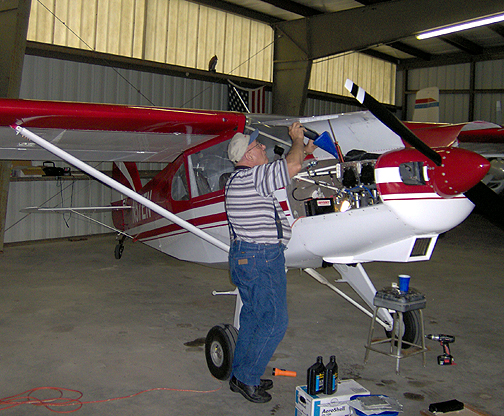
While the engine oil was draining and the engine was cooling off, my father-in-law Lonnie Gibbons and I took off most of the major inspection covers and the gap seal fairings on the bottom of the wings. We also took off the right inspection cover on the vertical stabilizer. Also removed were the front seats and the inspection cover on the floor between them. We also removed the bottom cover on the fuselage between the gear legs and the gascolator bowl and screen were removed and cleaned.
With all of the inspection covers off, I got my little inspection mirror
out and drop light and started looking everything over very carefully:

Every cable end, turnbuckle and pulley was thoroughly inspected. Every nut and bolt was looked at to make sure nothing had loosened. All cables, wires and fuel lines were checked for rubbing or fretting. The fuel line connections were checked for leaks. I did find a bit of seeping near the gascolator so I tightened that flare nut and it seems to have stopped it.
I looked in every inspection hole looking for anything that might be amiss. Once everything was checked, the engine had finally cooled enough to pull the oil screens. On the O-360 there are two oil screens (I don't have a remote oil filter). One screen is behind a safety wired 5/8" plug at the bottom rear of the oil sump. The other one at the rear top of the accessory case on the back of the engine where the oil temp probe hooks up. The casing is held on with 4 bolts.
The oil screens were removed and taken out into the sunlight to inspect them thoroughly for evidence of metal. They both had just a trace of tiny metal particles which is normal for the first oil change on a newly overhauled engine. These metal particles were checked with a magnet and none were found to be magnetic metal. Both screens had a bit of sludge, again, entirely normal. Nothing unusual was found during the inspection, so both screens were thoroughly cleaned in some Kerosene and then replaced.
Lonnie then added 7 quarts of Aeroshell 100 mineral oil:
With everything done, we went to work replacing all of the inspection covers. We carefully examined each screw head on the screws that hold the inspection covers in place and replaced any that showed signs of starting to strip out. These are cheap to replace and getting them out after they strip is very difficult.
With that done, I can get fully into my phase one test flying knowing that the airplane has been inspected after the initial "shake out" flights and nothing is coming loose or wearing out.
After some research on the internet, I was able to create some pretty good test flight cards (6" x 7") that will systematically take me through all phases of safely exploring the flight envelope on this brand new airplane. Click here to download my Phase One Test Flight Cards
These flight test cards were printed out and are currently clipped to my kneeboard. Once I make it through all of these test cards, I feel like I will have a pretty good handle on all of the flight characteristics of this aircraft. I will also have all of the information needed to complete the POH (Pilot Operating Handbook) for Bearhawk N57EN.
Some General Impressions
So far all of my takeoffs have been with no flaps. I will do the next ones with one or two notches to see how different that is. I find that the best technique (for me anyhow) is to line up with the centerline, hold the stick full back while feeding in the throttle, when I get it to full throttle, I push the stick almost all the way forward and hold it there until the tail comes up (about 100 feet down the runway) and then position the stick to keep the tail up, while keeping a slightly tail-low attitude. Once I'm in that position I find it very easy to keep it on the centerline with only slight rudder inputs, as the rudder is VERY effective. Now, when about 300 to 400 feet down the runway, a quick glance at the airspeed indicator says I'm doing about 60 to 65 MPH and she is feeling very light, so I smoothly pull the stick back and off she goes.
I haven't done the formal climb tests yet but have found that I like to keep about an 85 to 90 MPH climb which yields about 1,000 FPM in the 90+ degree temps I've been flying in this summer here in south Mississippi.
I did some power off stalls and some engine cooling testing during climbs one day last week. I also called Gulfport approach and verified the transponder was working and reading out the correct altitude. Power-off stall speeds were:
Clean = 50 MPH IAS
15 degrees flaps = 50 MPH IAS
25 degrees flaps = 48 MPH IAS
40 degrees flaps = 45 MPH IAS
I found that I couldn't pull the last notch of flaps (50 degrees) on. Later conversations with Bob revealed that you need to have it down to about 60 MPH or less to pull in that last notch. I was probably at about 75 MPH when I tried.
The stalls are very benign and no wing drop or unusual tendencies were noted. In fact you almost can't tell if it's actually stalling or not. I wasn't sure at first if I was getting a full stall, so I kept holding the stick all the way back to the stops and the nose dropped only slightly below the horizon and it was just kind of mushing around.
I did a little climb testing to see how engine cooling was. Did 2 minute climbs at full throttle starting at 2,000 feet and then did a partial power descent after each climb. OAT was 90 degrees. Climb speeds tried were 110 MPH, 100 MPH, 90 MPH, 80 MPH, and 70 MPH. CHT never got above 400F and the oil temp never got above 195F so that's looking good so far. I found that the engine RPM's exceeded the 2700 RPM red line at 110 MPH full throttle climb and I had to back off it a bit.
I find the handling characteristics to be excellent and it's very controllable at all airspeeds. The controls stay firm even in slow flight. As others have said, this is a rudder airplane. I find that leading each turn with little rudder in the correct direction works best. The same thing for rolling out of the turn, just start with a little rudder as you move the stick. I haven't done the stability tests yet, but just flying it around I find it is more stable than my RV was. In turbulence, my RV-6A did a lot of "tail-wagging" . I don't feel any of those tendencies with the Bearhawk.
Up until yesterday, all of my landings have been on the turf runway at my home base of Shade Tree airport. My landing accuracy has progressed to the point that I decided to try on an asphalt runway. So yesterday I flew over to Stennis International (KHSA) which has an asphalt runway that is 150 feet wide and 8600 feet long. Not knowing how my Bearhawk would act on asphalt, I wanted plenty of room. As it turns out, I didn't need it. Landing straight ahead on the centerline, I made a full stall, 3-point landing and she tracked straight and true down the centerline after touchdown. I find that most of the time, in my full stall landings, the tailwheel makes contact with the runway just before the mains do. I'll try some wheel landings soon and report on that.
Ido not have the wing strut or gear leg fairings installed yet so I haven't done the official cruise speed testing. Generally, I'm getting about 130 mph TAS at 2500 RPM at 4,000 feet. I have a MAP readout on my EIS system but haven't figured out how to set it up to give me an accurate read out yet. As is, it shows something like 74" so I obviously don't have the calibration right yet. Once I get that fixed I should be able to better figure out the percent of power being used.
With each flight, I find that I love this airplane even more. It is truly a joy to fly around and just sight-see with it. The visibility from the cockpit is excellent and its stable enough that you can just enjoy the scenery going past underneath you.
For all of you still bending metal, forming ribs, welding and riveting your Bearhawks together, keep at it. It is so worth it in the end!
Click here to go back to the Home page