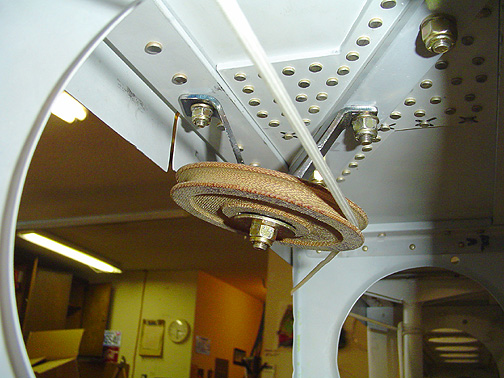
The pulley that goes near the strut requires a bracket that is fabricated out of .100 thick, 4130 steel plate.
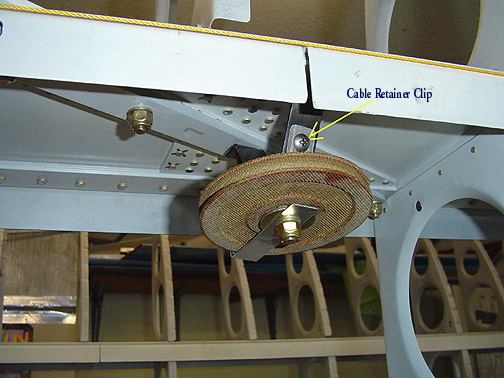
Like on the other pulley, a cable retainer was fabricated and installed for this pulley. Since the cable only takes a 30 degree turn here, only one leg is required on the retainer. To keep the retainer from turning, I made one leg a little longer and bent it to meet the steel pulley bracket arm. The arm was drilled and tapped to accept a 10-32 screw and the cable retainer clip was attached with a stainless steel screw:
The final bit of aileron control cable business is to install a fairlead near the flap drive support frame. If the aileron cable is installed to run directly from the bellcrank to the wing root, the cable will rub on the flap drive arm at a certain point. To prevent this, the cable must be slightly moved over near the flap drive arm.
This idea is not an original. It came from Russ Erb's CD (make sure you get a copy). To redirect the cable slightly, a fairlead is attached to a rib with an Adel clamp and a piece of aluminum angle attached to the rib:
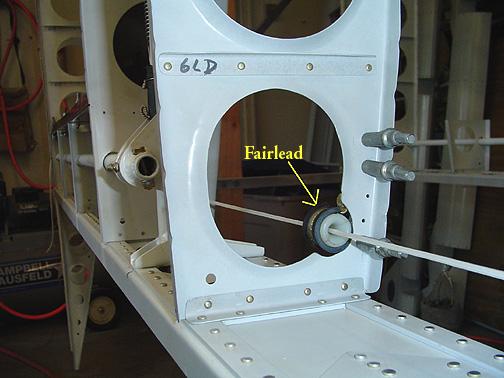
For more details on this, and why its needed get the CD. Russ does a great job of explaining this and showing before and after pictures.
Conduit
The final thing that I will install before skinning the wings is some conduit
to run wiring and the pitot tubing for the airspeed indicator. To be
absolutely as light as possible, its best to not have any wiring at all.
However, I may want to fly at night some day (or . . dare I say it?
Sell the airplane some day), so I want some nav/strobe lights
out at the wingtips.
The lightest way to accomplish this is to just run the wiring by itself through small holes in each rib with a snap in bushing or grommet in the holes to prevent chaffing. The only problem with that technique is the difficulty of ever adding anything at a later date (like a heated pitot, wing leveler device, or A.O.A. indicator, etc.) after the wing has been closed up. To give me maximum flexibility to add on later and yet keep it as light as possible, I am installing a 1/2" piece of thin walled conduit from the #2 rib nose rib, near the root end of the wing, to the #23 nose rib, near the wingtip.
You can see the white conduit running through the top hole of the nose ribs in the picture below:
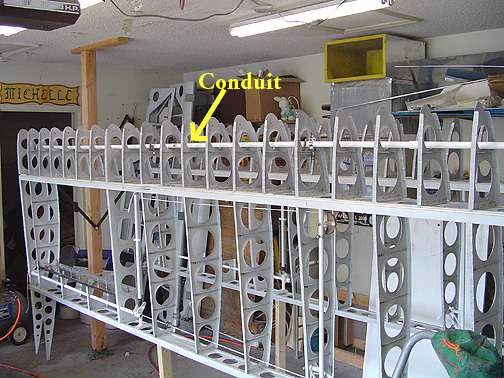
I made sure that I can reach the nose skin rivets for bucking and found that by putting the conduit in the forward hole of the nose rib, near the center of the hole, I can still reach all of the rivets.
As outlined in the April 1996 Beartracks Newsletter, the false spar at the aft end of the fuel tank bay, must have some doublers and nut plates attached for the fuel tank straps to attach to. To see my method for installing nutplates click here. Also, don't forget to drill out the proper rivets at the main spar to accept the bolts and nuts for the tank straps before skinning the nose section closed.
That's it for the internal components before skinning. All parts were disassembled, deburred, prepped and primed, then riveted or installed as called for.
All of the above was then repeated for the other wing.
Now its time to start the skinning process.
Wing Skeleton Assembly
Completed: April 18, 2004
Total Time: 83.50 hours
click here to go back to Wing Assembly page 4
Click here to go to the Wings Index page
Click here to go to the Home Page